Setting up a WooCommerce website is essential for anyone looking to succeed in e-commerce. WooCommerce, a powerful WordPress plugin, simplifies online store creation and management. This article provides a comprehensive, step-by-step guide to setting up a WooCommerce website, from selecting a hosting provider to adding products and optimizing for SEO. A well-configured WooCommerce site can significantly enhance your online business, ensuring a seamless shopping experience for customers and driving sales growth.
Step 1: Choosing a Hosting Provider and Domain Name
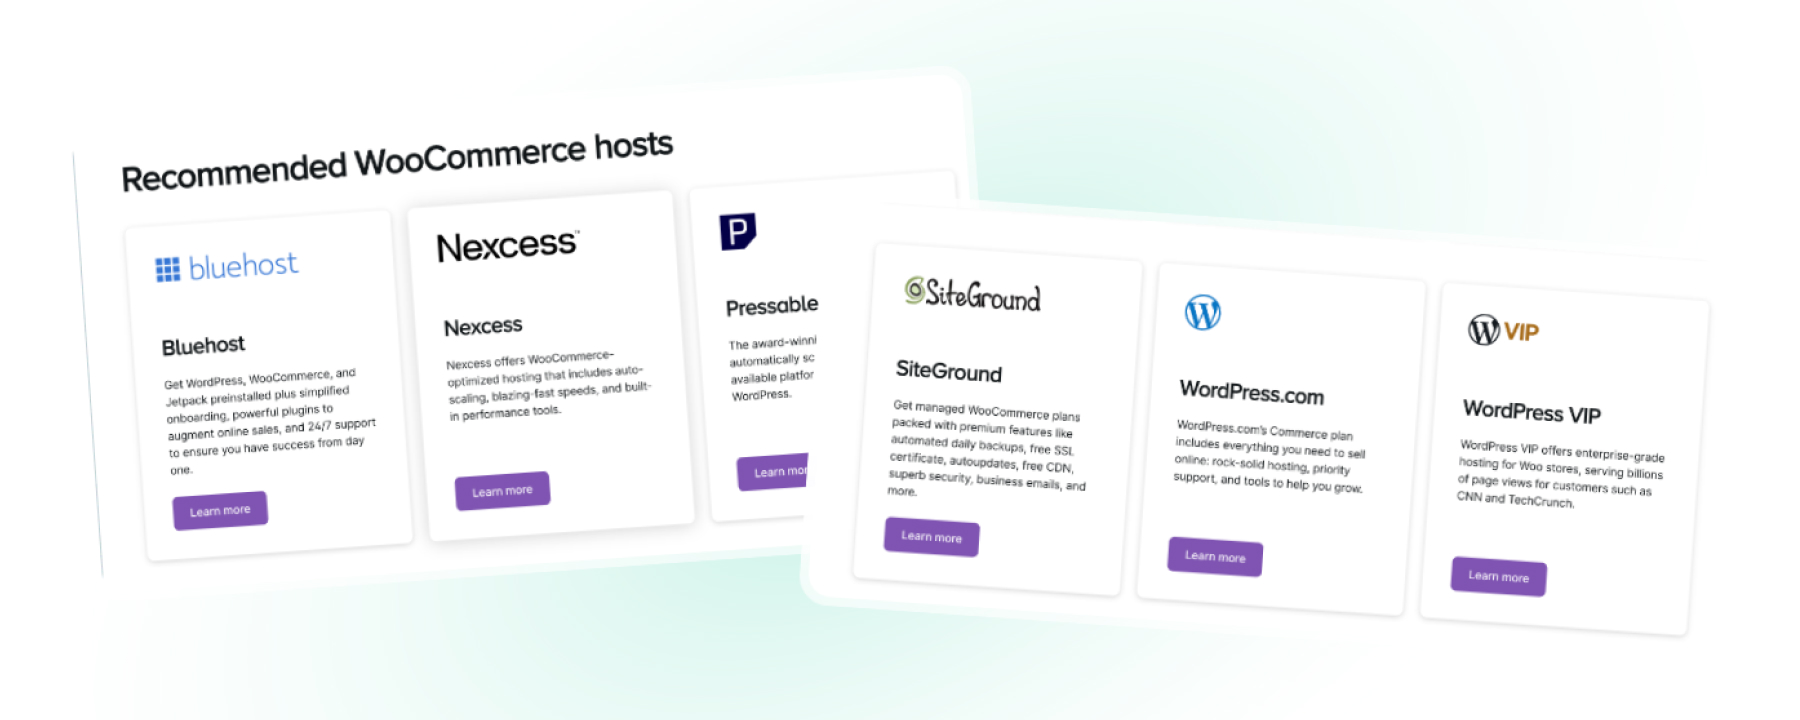
Selecting the right hosting provider is crucial for your WooCommerce website’s performance and reliability. Leading providers like Bluehost and SiteGround are highly recommended for their robust features, excellent customer support, and optimized performance for WordPress sites.
When choosing a domain name, aim for something short, memorable, and reflective of your brand. Ensure it’s easy to spell, and avoid using numbers or hyphens.
A step-by-step guide to purchasing hosting and domain
- Visit the hosting provider’s website (e.g., Bluehost, SiteGround).
- Select a suitable hosting plan (consider factors like storage, bandwidth, and support).
- Register your domain name during the setup process or use an existing one.
- Fill in your personal and payment information.
- Complete the purchase and follow the instructions to set up your hosting account.
What to look out for
When choosing a hosting provider for your WooCommerce website, it’s important to consider several key factors to ensure your website on Woocommerce runs efficiently:
- Look for a hosting provider that guarantees high uptime (99.9% or higher) and fast load times. This ensures your site remains accessible and provides a smooth user experience, minimizing potential revenue loss from downtime.
- Select a provider that offers scalable hosting solutions. As your business grows, you’ll need more resources. The ability to easily upgrade your plan ensures your site can handle increased traffic and demand without performance issues.
- Security is a key factor for any e-commerce site. Choose a provider with robust security features such as SSL certificates, firewalls, malware protection, and regular backups. These features help protect your site and customer data from cyber threats.
- Opt for a hosting provider with reliable 24/7 customer support. Quick and efficient support can help resolve any issues, minimizing downtime and maintaining customer trust.
- Ensure the hosting provider is optimized for WordPress and WooCommerce. Features like one-click installations, WooCommerce-specific performance enhancements, and compatibility with essential plugins are crucial for smooth operation.
- Compare pricing plans to ensure you’re getting good value for money. While cheaper options might seem appealing, they may lack essential features. Look for a balance between cost and services to get the best deal.
- Research customer reviews and the provider’s industry reputation. Feedback from other users can provide valuable insights into the provider’s reliability and customer satisfaction.
Step 2: Installing WordPress
WordPress is the backbone of your WooCommerce store, providing a robust and flexible platform for building your e-commerce site. As an open-source CMS, WordPress offers extensive customization options, a vast library of plugins, and a user-friendly interface.
Installing WordPress via the hosting provider
- Access your hosting dashboard: log in to your hosting account. Most hosting providers, like Bluehost and SiteGround, offer a straightforward installation process.
- Locate wordpress installation: find the WordPress installation option in your hosting dashboard. This is often under sections like “Website” or “Installations.”
- Start the installation: click on the WordPress installation button. You will be prompted to select the domain where you want to install WordPress.
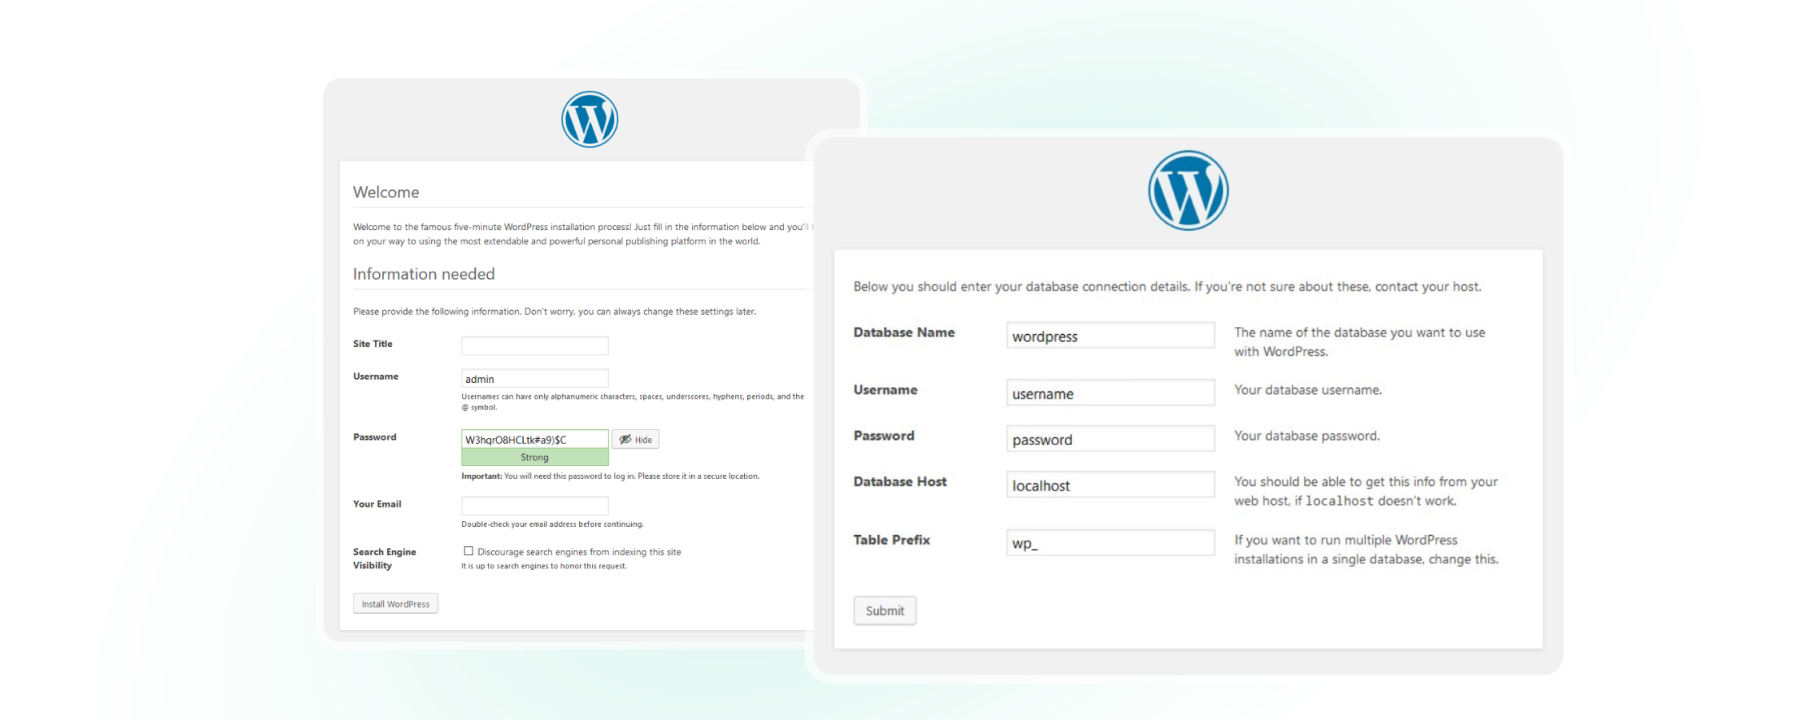
- Configure installation settings: enter the required details such as site title, admin username, password, and email. These details are crucial for managing your WordPress site.
- Complete the installation by clicking the “Install” button. The installation process will take a few minutes. Once complete, you will receive a confirmation message with your site login details.
Initial WordPress Setup
- Log in to your WordPress admin: use the admin details provided during the installation to log in to your WordPress dashboard (usually at yoursite.com/wp-admin).
- Set up your site title and tagline: navigate to “Settings” > “General” to update your site title and tagline, which are important for branding and SEO.
- To configure permalinks, go to “Settings” > “Permalinks” and choose the “Post name” option for more SEO-friendly URLs.
- Install essential plugins: start by installing plugins that enhance your site’s functionality, such as security plugins and SEO tools.
By following these steps, you’ll have WordPress installed and ready as the foundation for your WooCommerce store, setting the stage for further customization and product additions.
If any of these steps seem unclear or difficult, our team is ready to help you install WordPress right now. Don’t hesitate to reach out for immediate assistance.
Step 3: Installing and Configuring WooCommerce
WooCommerce is a robust and highly customizable plugin that turns your WordPress site into a comprehensive e-commerce platform. It supports a variety of products, from physical items to digital downloads and subscriptions, making it an ideal choice for diverse business models.
Installing WooCommerce from the WordPress Dashboard
- Access your WordPress dashboard
Log in to your WordPress admin area at yourdomain.com/wp-admin. - Navigate to plugins
From the dashboard, go to “Plugins” > “Add New.” - Search for WooCommerce
In the search bar, type “WooCommerce.” - Install WooCommerce
Locate the WooCommerce plugin in the search results and click “Install Now.” - Activate WooCommerce
After installation, click the “Activate” button. This launches the WooCommerce setup wizard, which guides you through initial configurations.
Initial Configuration Settings
- Store details
Enter your store’s address, country, and region accurately. This information is crucial for correctly setting up taxes and shipping. - Currency settings
Select your store’s primary currency. WooCommerce supports various currencies, allowing you to cater to different international markets. - Product types
Specify the types of products you will sell. WooCommerce supports physical goods, digital products, services, memberships, and subscriptions. Configuring this correctly ensures the appropriate options and settings are available as you add products. - Payment methods
Set up your payment gateways. WooCommerce natively supports popular options like PayPal and Stripe, but you can also integrate additional gateways through extensions. Ensure your payment methods align with your target market preferences for a smooth transaction experience. - Shipping settings
Configure your shipping options. Define shipping zones, methods, and rates based on your delivery capabilities and customer locations. You can set different shipping methods for each zone, such as flat rate, free shipping, or real-time carrier rates.
Technical and Business Considerations
- WooCommerce is designed to grow with your business. Ensure your hosting provider can handle increased traffic and transactions as your store expands.
- To protect customer data, implement SSL certificates and regular security audits. WooCommerce offers several security plugins to enhance protection.
- WooCommerce is SEO-friendly, but further optimization with plugins like Yoast SEO for WooCommerce can help improve your store’s visibility in search engines.
- Use WooCommerce’s built-in reporting tools to track sales, monitor inventory, and understand customer behaviors. Integrate with Google Analytics for deeper insights.

🔎Learn more about how to optimize performance for WooCommerce stores
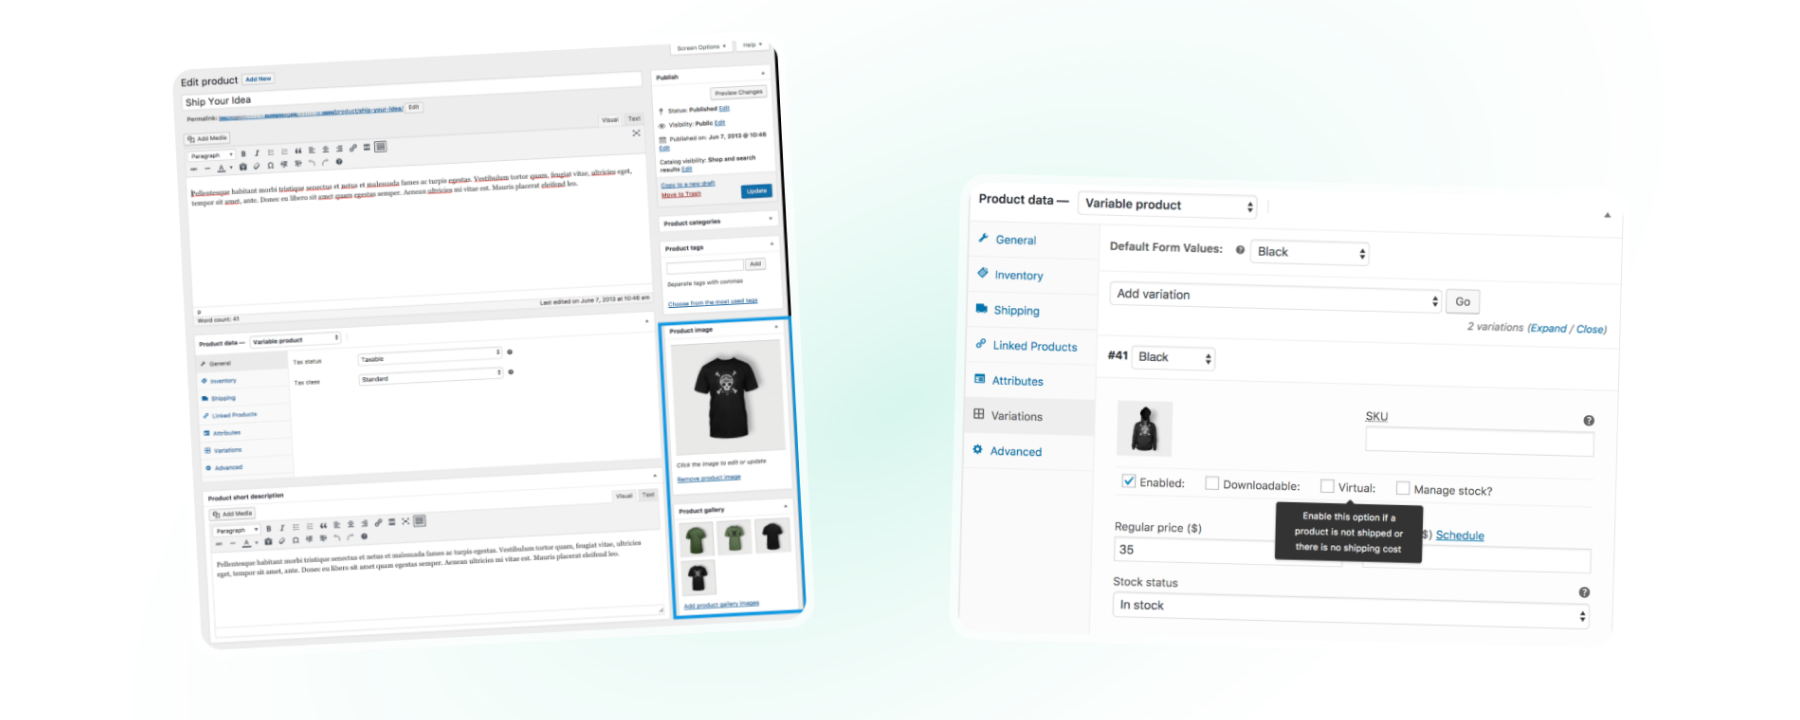
Step 4: Adding Products to Your Store
WooCommerce supports various product types, including physical products, digital downloads, and subscriptions, catering to diverse business needs.
Instructions for Adding a New Product
- Access your WordPress dashboard
Log in to your WordPress admin area (yourdomain.com/wp-admin). - Navigate to products
From the dashboard, go to “Products” > “Add New.” - Enter product details
– Title – provide a clear and concise product name.
– Description – add a detailed description in the main editor area, including key features and benefits.
– Product Data – select the appropriate product type (simple, grouped, external/affiliate, variable).
– Price – enter the regular price and sale price if applicable.
– SKU – provide a unique stock-keeping unit for inventory management. - Add product images
– Product Image – set a primary image that represents the product.
– Product Gallery – add additional images to showcase different views or variations. - Set up product categories and tags
– Categories – add the product to one or more categories on the right sidebar. Categories help organize products and improve site navigation.
– Tags – add relevant tags to describe product attributes. Tags enhance search functionality and user experience.
Step 5:Choosing and Customizing a WooCommerce Theme
Selecting the right theme for your WooCommerce store is crucial for creating a visually appealing and user-friendly site. A good theme enhances the shopping experience and can significantly impact your store’s performance.
Recommended WooCommerce-Compatible Themes
- Storefront – developed by WooCommerce, it’s highly compatible and customizable.
- Astra is known for its speed and flexibility, and it offers numerous WooCommerce-specific features.
- Flatsome – a popular choice with a drag-and-drop page builder and extensive customization options.
How to Install and Activate a WooCommerce Theme
- Access your WordPress dashboard
Log in to your WordPress admin area (yourdomain.com/wp-admin). - Navigate to themes
Go to “Appearance” > “Themes” > “Add New.” - Search for a theme
Use the search bar for a WooCommerce-compatible theme (e.g., Storefront). - Install and activate
Click “Install” on your chosen theme, then click “Activate” to apply it to your site.
Basic Theme Customization Using the WordPress Customizer
- Access the customizer
Go to “Appearance” > “Customize.” - Customize your theme
– Site Identity: add your logo, site title, and tagline.
– Colors: choose a color scheme that matches your brand.
– Typography: Adjust fonts for readability and aesthetic appeal.
– Layout: Configure the layout of your site’s header, footer, and main content areas.
We are here to assist you with customizing, optimizing, or developing a theme tailored to your online store’s unique needs. Reach out to us for a consultation to get started.
Step 6: Setting Up Payment Gateways
Setting up payment gateways is essential for processing transactions securely and efficiently on your WooCommerce store. Popular options include PayPal and Stripe, which are known for their reliability and ease of integration.
Overview of Payment Gateway Options
- PayPal – widely used, it offers secure payment processing and supports various currencies.
- Stripe is a versatile option that handles credit card payments directly on your site, providing a seamless checkout experience.
Setting Up a Payment Gateway in WooCommerce
- Access your WordPress dashboard
Log in to your WordPress admin area (yourdomain.com/wp-admin). - Navigate to WooCommerce settings
Go to “WooCommerce” > “Settings” > “Payments.” - Enable your chosen payment gateway
For PayPal, click the toggle next to “PayPal” and then click “Set up.” For Stripe, enable the toggle next to “Stripe” and click “Set up.” - Configure payment gateway settings
Enter the required details, such as API keys, email addresses, and account information. Then, follow the on-screen instructions to complete the setup. - Save changes
Click “Save changes” to finalize the configuration.
Tips for Securing Payment Transactions:
- SSL certificate – ensure your site uses an SSL certificate to encrypt data during transactions.
- PCI compliance – choose PCI-compliant gateways to adhere to security standards.
- Regular updates – keep WooCommerce and all plugins updated to protect against vulnerabilities.
- Fraud prevention – use fraud prevention tools and monitor transactions for suspicious activity.
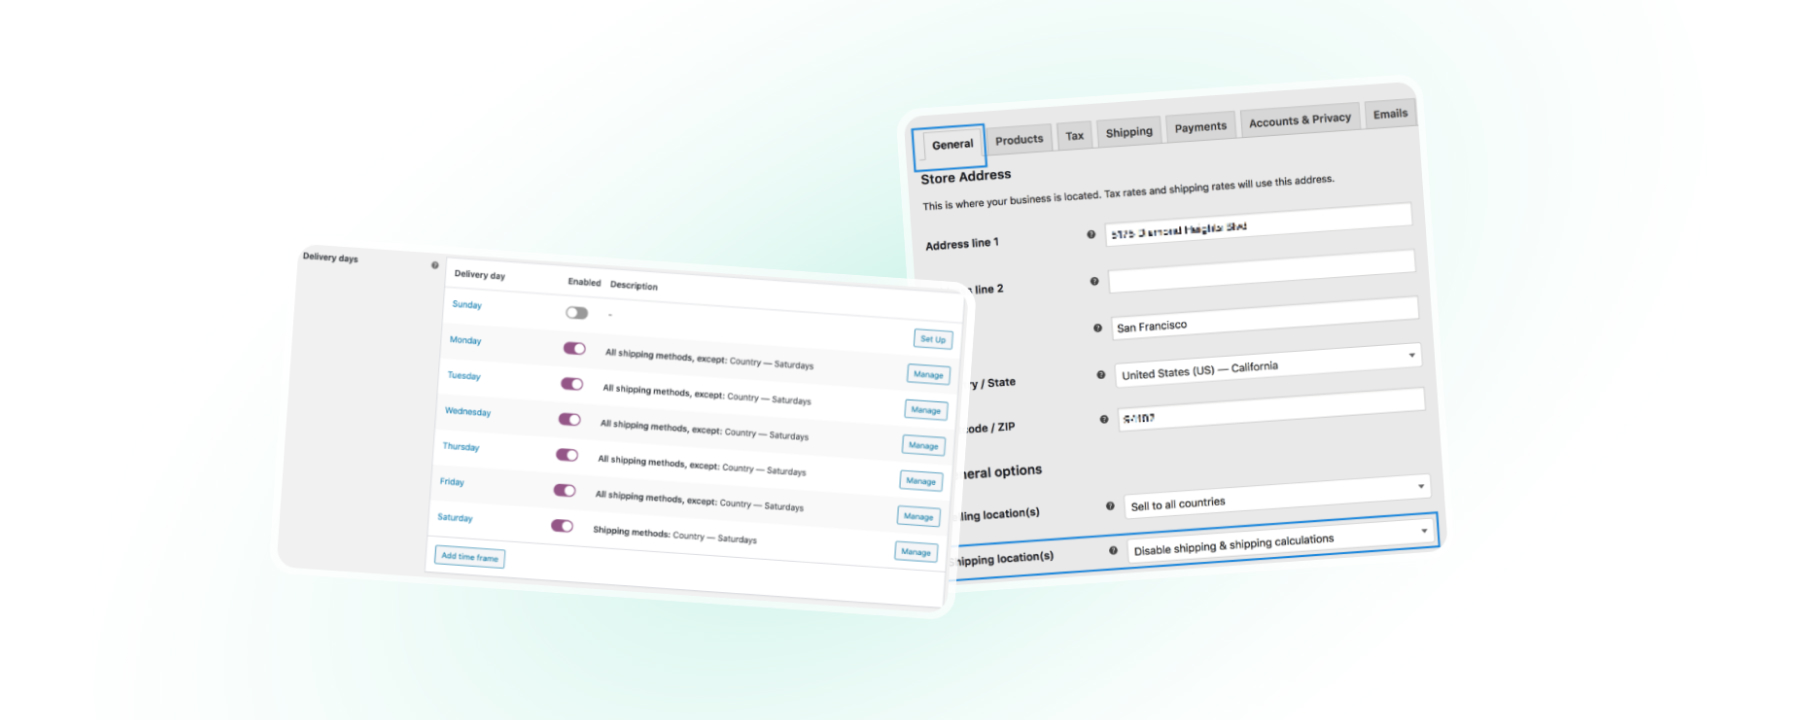
Step 7: Configuring Shipping Options
Configuring shipping options in WooCommerce ensures your customers receive their orders efficiently and at a reasonable cost. WooCommerce provides flexible settings to manage shipping zones, rates, and classes.
Explanation of WooCommerce Shipping Settings
WooCommerce allows you to define shipping zones (geographic regions), assign shipping methods to each zone, and set rates based on weight, dimensions, and location. This flexibility helps you tailor shipping options to different markets and product types.
Setting Up Shipping Zones and Rates:
- Access your WordPress dashboard
Log in to your WordPress admin area (yourdomain.com/wp-admin). - Navigate to shipping settings
Go to “WooCommerce” > “Settings” > “Shipping.” - Add shipping zones
Click “Add shipping zone.” Enter a zone name (e.g., “US”) and select the regions in this zone. - Add shipping methods
Click “Add shipping method” within the zone. Choose options like Flat Rate, Free Shipping, or Local Pickup, and configure the details accordingly. - Set shipping rates
For Flat Rate, click “Edit” to set the cost. You can also add additional rates based on shipping classes or product-specific rules.
How to Configure Shipping Classes for Different Product Types
- Access shipping classes
Go to “WooCommerce” > “Settings” > “Shipping” > “Shipping Classes.” - Add shipping classes
Click “Add shipping class.” Provide each class’s name, slug, and description (e.g., “Heavy Items”). - Assign shipping classes to products
Go to “Products” > “All Products,” edit a product, and scroll down to the “Shipping” tab. Select the appropriate shipping class from the dropdown menu. - Set shipping costs for classes
Return to the shipping zone settings, edit the shipping method, and add costs for each shipping class under the “Cost” section.
Step 8: Installing Essential Plugins
Plugins are crucial for expanding the functionality of your WooCommerce store. They help improve SEO, enhance security, boost performance, and add various features to optimize the user experience and streamline your operations.
Recommended Plugins for WooCommerce
- Yoast SEO – enhances your site’s search engine optimization, helping you attract more traffic.
- Wordfence Security – provides robust security features to protect your site from threats.
- WP Rocket– improves site performance by optimizing caching, reducing load times, and enhancing user experience.
- Mailchimp for WooCommerce – integrates email marketing tools to help you effectively manage and communicate with your customers.
Installing and Activating Plugins
- Access your WordPress dashboard
Log in to your WordPress admin area (yourdomain.com/wp-admin). - Navigate to plugins
From the dashboard, go to “Plugins” > “Add New.” - Search for a plugin
Use the search bar to find the plugin you need (e.g., “Yoast SEO”). - Install the plugin
Click “Install Now” next to the plugin you want to add. - Activate the Plugin
Once installed, click “Activate” to enable the plugin on your site. - Configure plugin settings
Each plugin may have its own setup process. From the dashboard, navigate to the plugin’s settings page and configure it according to your requirements.

Step 9: Setting Up Essential Pages
Essential pages like the shop, cart, checkout, and my account pages are crucial for any WooCommerce store. These pages facilitate the shopping process, making it easier for customers to browse products, manage their purchases, complete transactions, and access their account details.
Creating and Configuring These Pages
- Access your WordPress dashboard
Log in to your WordPress admin area (yourdomain.com/wp-admin). - Navigate to WooCommerce setup wizard
If you haven’t already, complete the WooCommerce setup wizard, which will automatically create these essential pages. - Check page creation
Go to “Pages” in the dashboard and ensure that the shop, cart, checkout, and my account pages have been created. - Manually create pages (if needed)
If any pages are missing, go to “Pages” > “Add New,” create a new page, and assign the appropriate WooCommerce shortcode:
– Shop Page: [woocommerce_shop]
– Cart Page: [woocommerce_cart]
– Checkout Page: [woocommerce_checkout]
– My Account Page: [woocommerce_my_account] - Assign pages in WooCommerce settings
Navigate to “WooCommerce” > “Settings” > “Advanced,” and ensure that the correct pages are assigned under the “Page setup” section.
Tips for Optimizing Page Layouts and User Experience
- Shop page – display clear product categories, use high-quality images, and enable product filters to enhance navigation.
- Cart page – simplify the layout, clearly summarize items, and include a prominent checkout button.
- Checkout Page – streamline the process by minimizing the number of steps, offering multiple payment methods, and ensuring mobile responsiveness.
- My account page – make it easy for users to view order history, manage addresses, and update account details.
Step 10: Launching Your WooCommerce Store
Final Preparations Before Launch
- Review your site—double-check all your pages, product listings, and settings to ensure everything functions correctly.
- Test transactions – perform test purchases to ensure the checkout process is smooth and error-free.
- Optimize for speed – use tools like Google PageSpeed Insights to ensure your site loads quickly.
Tips for a Successful Launch
- Promotions – create special launch offers or discounts to attract initial customers. Consider using limited-time offers to create urgency.
- Social Media – leverage social media platforms to announce your launch. Share engaging content, behind-the-scenes looks, and sneak peeks of products.
- Email Marketing – send a launch announcement email to your subscriber list. Highlight key products and offer an exclusive discount to email subscribers.
Monitoring Your Store’s Performance Post-Launch
- Analytics – use tools like Google Analytics and WooCommerce’s built-in analytics to monitor traffic, sales, and customer behavior.
- Feedback – encourage customers to leave reviews and provide feedback. Use this information to make necessary adjustments.
- Adjust marketing strategies – analyze which marketing efforts are most effective and adjust your strategy accordingly.
If you need further assistance with your launch, our team is ready to help you ensure everything goes smoothly.
🔎Learn more about WooCommerce and why you should choose it to create a powerful online store
Final <span>Thoughts</span>
Setting up a WooCommerce store involves several critical steps, from choosing the right hosting provider and installing WordPress to configuring essential plugins and launching your store. Each step, from adding products and configuring shipping options to setting up payment gateways and essential pages, ensures a smooth and efficient online shopping experience. Thorough preparation and effective marketing strategies are key to a successful launch. Post-launch, continuous monitoring, and optimization will help maintain and enhance your store’s performance. If you encounter any challenges, our team is ready to assist you in creating a robust and thriving WooCommerce store. Contact Artilab for custom WooCommerce development or consulting. We are always ready to help.